Raw vegan nachos are the ultimate vibrant, nutrient-dense answer to your deepest snack cravings. If you have been searching for a recipe that delivers a satisfying crunch without the heavy, greasy aftermath of traditional chips, this is the dish that will transform your plant-based game. By swapping processed corn chips for crisp bell pepper triangles and chilled jicama slices, we create a base that is naturally hydrating and incredibly refreshing.
This recipe isn’t just about health; it’s about a symphony of textures and bold, zesty flavors that satisfy even the most devoted carnivores. We are layering thick, velvety cashew cheese sauce over a “meat” made from sun-dried tomatoes and walnuts, then finishing it all with a garden-fresh medley of toppings. Whether you are deep into a raw vegan diet or just looking for a show-stopping appetizer for your next gathering, these nachos deliver on every level.
Why You Will Crave These Vibrant Raw Vegan Nachos
- The Ultimate Crunch: The combination of chilled jicama and snap-fresh bell peppers provides a structural integrity that never gets soggy under the weight of the sauce.
- Protein-Packed Toppings: Between the walnut-based meat and the hemp heart sprinkles, this dish is a powerhouse of healthy fats and plant-based protein.
- Zero-Cook Convenience: Perfect for hot summer days, this entire meal is prepared without ever turning on the oven, keeping your kitchen cool and your nutrients intact.
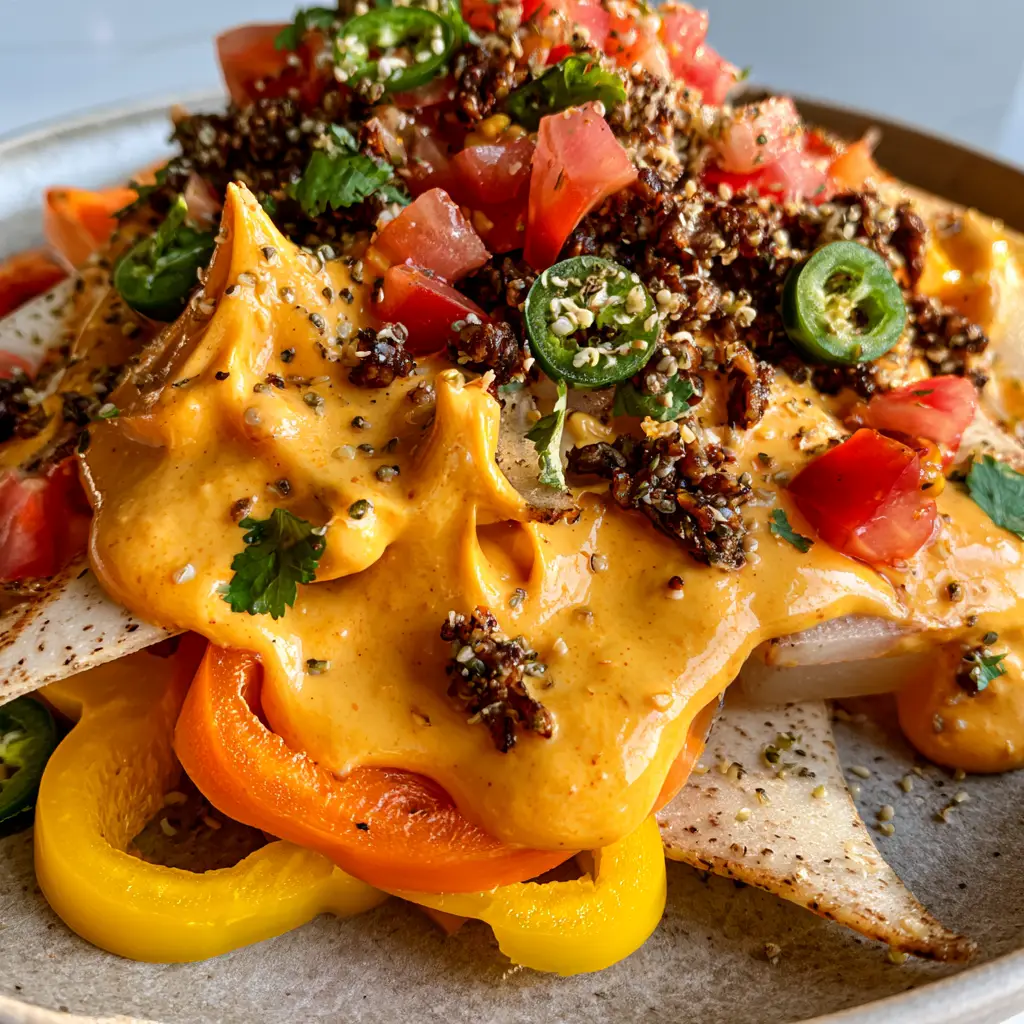
- Visual Masterpiece: With bright orange sauce, ruby red tomatoes, and emerald cilantro, this dish is a literal rainbow on a plate, making it one of the most popular raw food recipes for beginners to try.
The Anatomy of a Perfect Raw Nacho: Ingredients & Substitutions
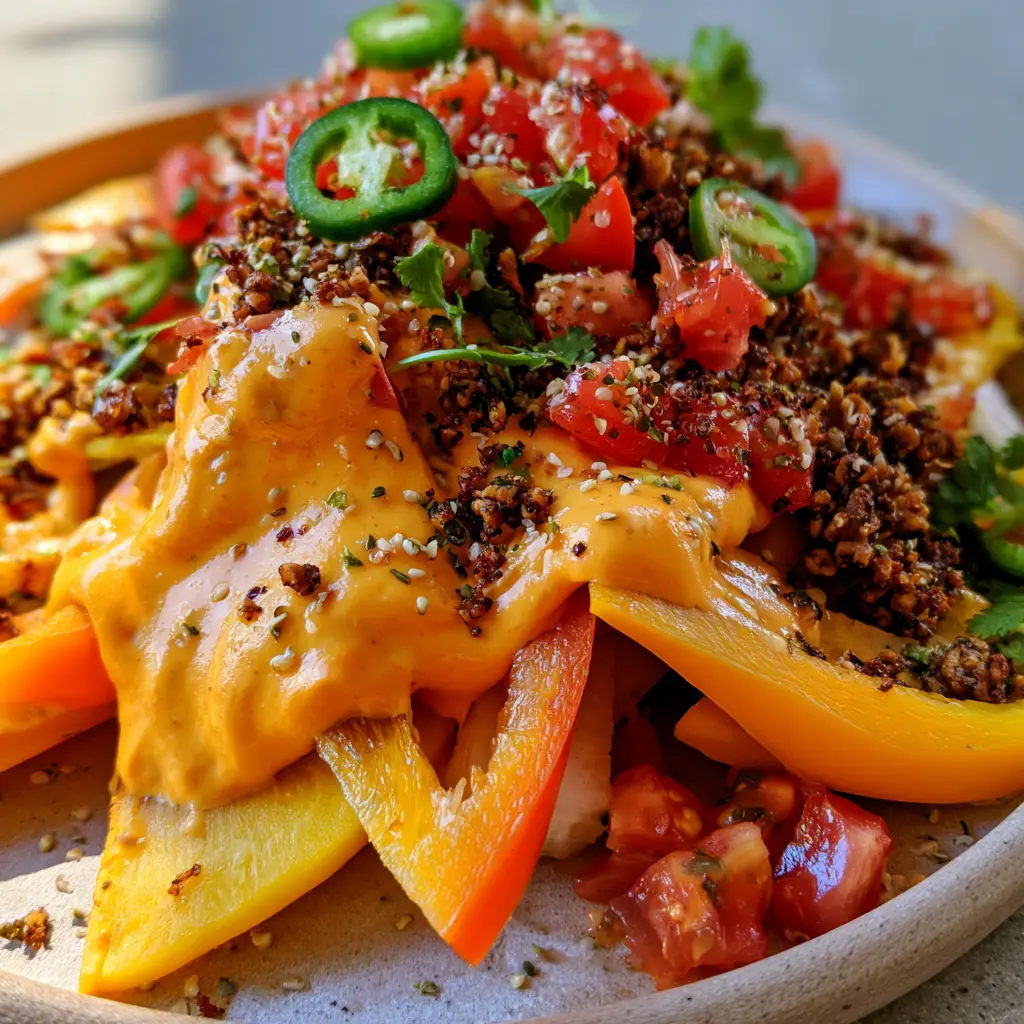
To achieve the forensic visual accuracy required for a Pinterest-worthy plate, each ingredient serves a specific culinary purpose. We are building layers of flavor that mimic the traditional experience while utilizing 100% whole, plant-based foods.
The “Chips”: We use 2 large yellow and orange bell peppers cut into triangles and 1 small jicama, peeled and sliced into 1/4 inch (6mm) thick rounds, then halved. Jicama provides a starchy, potato-like crunch that is essential for that “nacho” mouthfeel.
The Savory Walnut Meat: A blend of 1.5 cups (150g) raw walnuts, 0.5 cup (30g) sun-dried tomatoes (soaked), and taco spices. This creates a dark, crumbled texture that looks and tastes remarkably like seasoned ground beef.
The Thick Cashew Cheese: 1 cup (150g) raw cashews soaked for at least 4 hours, blended with 1 small carrot (for that bright orange hue), nutritional yeast, and lemon juice. This sauce is designed to be thick enough to show visible peaks and drips when drizzled.
The Fresh Garnishes: You will need 2 Roma tomatoes (diced), 1 fresh jalapeno (sliced into thin rings), a handful of fresh cilantro sprigs, and 2 tablespoons (20g) of hemp hearts for that final “dusting” of texture and protein.
How to Make Raw Vegan Nachos: Step-by-Step Mastery
1. Prepare the Base Vegetables
Start by preparing your “chips.” Cut the bell peppers into uniform triangles, roughly the size of a standard tortilla chip. Peel the jicama and slice it into thin, sturdy rounds. For the best experience, place the jicama slices in a bowl of ice water for 10 minutes, then pat them dry. This “chilling technique” ensures the maximum possible snap when you take a bite.
2. Pulse the Savory Walnut Crumble
In a food processor, combine the raw walnuts, soaked sun-dried tomatoes, 1 teaspoon (5ml) of cumin, and a pinch of sea salt. Pulse carefully. You want a “crumbled” look, not a paste. The sun-dried tomatoes provide the dark, savory color and a deep umami flavor that mimics cooked meat. This is one of those high-protein snacks components you’ll want to keep in your fridge at all times.
3. Blend the Heavy Cashew Cheese Sauce
Drain your soaked cashews and place them in a high-speed blender. Add the peeled carrot, 3 tablespoons (45ml) of nutritional yeast, the juice of half a lemon, and 1/4 cup (60ml) of water. Blend on high until the sauce is completely smooth and glossy. If it’s too thin, add a few more cashews; if too thick, add water one teaspoon at a time. It should be thick enough to hold its shape when drizzled over the peppers.
4. Assemble the Messy Masterpiece
Plating is where the magic happens. On a matte stone surface or large platter, pile the bell pepper and jicama chips high. Layer them so every “chip” has a chance to catch the toppings. Generously crumble the walnut meat over the base. Next, apply a heavy drizzle of the orange cashew cheese, ensuring you see those beautiful visible peaks and drips mentioned in the visual blueprint.
5. The Final Garnish Loop
Scatter the finely diced Roma tomatoes across the top. Add the jalapeno rings—keep them thin so they provide heat without overpowering the other flavors. Tuck in small sprigs of cilantro and finish with a dusting of hemp hearts. The result should look messy, abundant, and utterly appetizing.
Expert Tips for Raw Nacho Success
- Soak Your Nuts: Do not skip soaking the cashews for at least 4 hours (or overnight). This ensures the “cheese” is smooth rather than grainy, which is vital for that glossy, professional look.
- Acid Balance: If the cashew cheese feels a bit flat, add a tiny splash of apple cider vinegar. The acid cuts through the richness of the nuts.
- Uniform Slicing: Use a mandoline for the jicama if you have one. Consistent thickness ensures every bite has the same satisfying crunch.
- Serve Immediately: While these are more resilient than corn chips, the vegetables will eventually release moisture. Assemble just before you are ready to enjoy!
Storage and Meal Prep Instructions
These Raw vegan nachos are best enjoyed fresh, but you can meal prep the components! The cashew cheese will stay fresh in an airtight container for up to 5 days. The walnut meat can be stored for 4 days. Keep the sliced peppers and jicama in a sealed bag with a damp paper towel to maintain crispness. Do not freeze the assembled nachos or the fresh vegetable chips, as the texture will become soft upon thawing.
What to Serve With Your Nachos
If you are serving these as a main course for a healthy family dinner recipe, consider pairing them with a side of crunchy asian edamame salad for extra bulk. For a full raw feast, you could even follow up with one of your favorite raw vegan desserts.
Frequently Asked Questions
Absolutely. By using bell peppers and jicama instead of corn chips, these nachos are significantly lower in net carbs and rich in healthy fats from the walnuts and cashews.
Yes! You can substitute the cashew cheese with a sunflower seed-based sauce and use pulsed sunflower seeds or cauliflower florets for the ‘meat’ crumble to keep it nut-free.
Soaking is highly recommended for the smoothest texture. If you are in a rush, you can soak them in very hot water for 30 minutes, though long-term soaking is better for digestion.
The key is using sturdy vegetables like jicama and bell peppers. Avoid using watery vegetables like cucumber as the base, and wait to drizzle the sauce until just before serving.
The Ultimate Raw Vegan Nachos Recipe
Raw vegan nachos with Creamy Cashew Cheese and Savory Walnut Meat
Ingredients
Equipment
Method
- Slice bell peppers into triangles and jicama into thin half-moons. Chill in ice water for 10 minutes for maximum crunch, then pat dry.
- Pulse walnuts, sun-dried tomatoes, and cumin in a food processor until it reaches a crumbled, meat-like consistency.
- Blend soaked cashews, carrot, nutritional yeast, lemon juice, and a splash of water until completely smooth and thick.
- Layer the veggie chips, top with walnut meat, drizzle heavily with cashew cheese, and scatter fresh tomatoes, jalapenos, cilantro, and hemp hearts.
Notes
Chill the jicama slices in ice water to ensure they are extra crisp.
Save, Share, and Rate!
Did these Raw vegan nachos satisfy your crunch craving? I want to see your messy, delicious recreations! Please save this recipe to your Pinterest board so you never lose it, and follow diane_kitchen_1 for more vibrant plant-based inspiration. If you made this, please leave a 5-star rating in the recipe card above and drop a photo of your plate in the comments below! Happy “cooking!”